"You know, Burke, I don't know which species is worse."
![]()
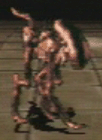
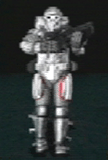
THE ALIENS
![]()
"It was with us all the way."
![]()
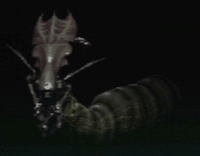
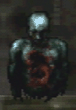
THE ALIENS
![]()
"It was with us all the way."
Although the number of shots from a particular weapon required to down a specific caste of alien will vary quite a bit throughout the game, on a single level the lethal number of hits will usually remain constant. In the few exceptions that occur, the number of hits needed to do the job will be fewer than normal. It is important to score direct hits whenever possible, especially with the shotgun or flame thrower which have wider damage arcs than the other weapons. Additionally, shots from these weapons (plus the pistol) at their extreme ranges do not do the same damage as shots at targets easily within range. The result is that you may find yourself having to pump an extra volley or two into an alien before it expires. Even the pulse rifle and smartgun will do only partial damage when the aim is off a bit (as seen by the occasional activation rather than destruction of eggs); this is usually only noticeable at longer ranges. For seismic charges and pulse rifle grenades, only a direct hit will "vaporize" an alien (cause a shower of acid but leave no visible carcass behind). When playing on HARD, if you can see any remains, then that alien can come back! In some areas, if you move cautiously enough, you will encounter "frozen" aliens that have not reacted to your presence yet. There appear to be three varieties. Some will remain frozen as you fire a first shot at them and you can score an easy kill with the pulse rifle (one burst for facehuggers and chestbursters or a grenade for bigger folks). Some start moving the second you fire at them, so you have to lead them to take advantage of that first easy shot. Both of these varieties will come after you if that first shot does not result in a kill. The final group will run a bit upon receiving a hit (assuming you didn't use a grenade) and then stop, offering another easy shot. This may be repeated several times until the alien is dead or eventually turns and comes after you. The long-range pulse rifle is the weapon to use here; none of the enemies remain frozen within shotgun distance!
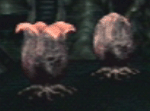
These begin showing up in greater numbers as you near the queen's lair in each of the three trilogy parts. Don't get too close or the facehugger inside may be explosively released! The primary threat of eggs is that they may be hidden in alcoves and corners where you might not spot one until it is too late. They can also be a problem in areas where they occur in dense groupings (go carefully!) or when you find one right in your path as you scurry from more animate enemies. The pistol and flame thrower tend to "activate" eggs before completely dispatching them and are risky to use (the flame thrower also has a shorter effective range). An insufficient or indirect hit with even the more potent weapons will also "activate" the egg: it will open without releasing a facehugger, but it is now far more likely to release its contents than it was before. Walking too close to an egg has the same effect. Use the pulse rifle at long range whenever possible. At moderate ranges the shotgun does well. While the smartgun is effective for taking out multiple eggs in single bursts where eggs occur in clusters, you should really save this ammo for more difficult foes. When playing on HARD, be especially careful to toast eggs without releasing the facehuggers: eggs don't revive upon your return, but released facehuggers will.
The first enemies you will encounter, and probably the commonest foes in the game. When blowing up crates that contain facehuggers, try to guard any exits so that you don't have to chase one too far to kill it (this can be dangerous on the HARD difficulty level because wandering too far rouses previously killed enemies). Also, on HARD avoid opening crates known to house 'huggers in an area you will have to return to; instead, blow the crates on your return trip to avoid killing these enemies twice. A facehugger just released by an exploding crate (or locker or incubator) is unkillable for about one second, so blow crates at a moderate distance (or simply back up) and then wait briefly before dispatching the critter. The same holds true if you accidentally "blow" an egg and release the facehugger. Conversely, 'huggers coming out of walls or other hiding places are usually killable as soon as they appear. When crates containing multiple facehuggers are next to exploding barrels, blow up the crates first one at a time to release the 'huggers gradually instead of en masse. When one crate (or stack) is left, blow the barrels. Down side: this does use up critical ammo unless you stick with the pistol, which you won't use for much else (if at all) in the later levels. These guys take 2-3 pistol rounds or a single direct hit from any other weapon before going down. The pulse rifle is best for nailing these aliens before they get within hugging range. The shotgun is great for any number of 'huggers at medium ranges. With practice you can wheel on a facehugger beside or behind you (visible only on your motion tracker) and touch off the trigger at precisely the right moment to kill it, just by checking your timing on the tracker. When the party gets close-up and crowded, though, spinning with the flame thrower will be your best bet. Even then one of the tenacious beasts may get you. BEWARE! Getting facehugged will bring your health down 3 points no matter how much armor you have! That fact makes these little guys, in a way, deadlier than any other enemy in the game once you've acquired your first suit of armor. If you back up while being facehugged, you can actually see the spent carcass drop off you and onto the floor. And yes, even a spent facehugger husk will revive at the HARD difficulty setting. (If you've played Alien vs. Predator for the Atari® JaguarTM, you will discover an additional reason to avoid being 'hugged in Alien Trilogy: the pixellated blob that pops up in front of you when it happens makes being nabbed by the much clearer AVP facehuggers an almost welcome event!).

Oddly enough, these can inflict damage even when relatively far away, apparently by simply jumping up into the air and squealing. Only the queen herself has a longer reach among the alien enemies. It is therefore best to take these out at a distance with the pulse rifle. 'Bursters will also pop out of infected humans. Shoot these humans at long range with the pulse rifle to avoid this. Chestbursters at close range move quite rapidly and can be hard to hit--the shotgun throws a wider arc of damage than the other weapons and is the choice for closer work; the flame thrower is choice two here because of its shorter range.
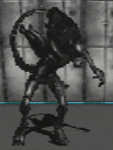
For some reason these take a highly variable number of shots to kill, although this actually adds a bit to the suspense of the game and is actually a lot more realistic. In a few select spots, you will find one of these behind crates or barrels that can't reach you, providing you with a safe place to shoot from. If you are desperately low on ammo, it will take 15 direct pistol hits to bag one, but the pistol is the absolute last resort (without a barricade to hide behind, you'll probably die first!). The shotgun is pretty good for singles or doubles; warriors are easiest to kill near maximum shotgun range because they dodge a lot and you have to swivel quite fast to keep up with one that gets too close. Four to 10 shotgun blasts or 3 to 8 pulse rifle bursts will take one down. For larger groups, the smartgun is your only real defense. Charges and grenades will also work, but in these situations the aliens are usually pretty close and you may take more damage from your own ammo than you would from the enemies you are trying to kill. You will sometimes encounter warriors scurrying about on the ceiling. They appear not to be dangerous--I've never had one drop down and come after me. They are simply hard to hit because they like to stay directly above your head. The easiest method for downing one is to use the smartgun (if available); aim as high as you can and keep your distance from the alien. "Smart" bullets will fly up at a sharper angle than you can aim with any of the other weapons, scoring hits quickly. Unless you are really having a tough time dropping these, however, you should stick with the following methods, saving the smartgun for more dangerous situations. The best tactic is using the pulse rifle at long range. You will have to run away from the ceiling-bound warrior, spin around, and fire off a few salvos while aiming up before he gets so close you can no longer hit him. The obliging enemy will usually follow you in a straight line, making life a bit easier for you and in direct contrast to warriors of the terrestrial variety. You will have to repeat this several times until the warrior expires and drops to the floor. Choice two is to use the shotgun in the same manner and only fire at moderate ranges, but the shotgun will not reach as far as the pulse rifle and you usually can't get off as many shots before the warrior gets too close. This weapon will cause some damage at closer ranges than the pulse rifle due to its wider firing arc. The shotgun method will also require some repetition in order to score a kill. Once in a while you will find a ceiling-hanger that gets "stuck" against something on the ceiling, presenting an easy target.
Intermediate between a dogburster (which appears only as this larger form in Alien Trilogy) and an adult dog alien. At close range you may actually need to aim down to hit these as they are smaller than warriors and adult dogs but don't jump up into the line of fire like facehuggers or chestbursters. Using the shotgun (2-3 rounds) and flame thrower alleviates this problem somewhat. The smartgun also works but you really want to save this baby for larger prey. It is best to dispatch these at a distance with 2-3 pulse rifle bursts if you can. While not particularly dangerous, young dogs almost always travel in packs and if they get too close, you may find yourself overwhelmed.

The number of hits necessary to kill an adult dog REALLY varies! On most levels it will take about 4-8 shotgun blasts or 3-6 pulse rifle bursts, but on Level 262 (LEAD MOULD), it takes 26 (count 'em!) shotgun or 22 pulse rifle hits! They behave similarly to warriors, but they do not dodge as much or move quite as rapidly as warriors and therefore present easier targets. The only location where you encounter both large xenomorphs at the same time is Level 325 (PILOT'S CHAMBERS 5). While the warriors on this level require an uncharacteristically easy 3 pulse rifle hits for a kill, you can still observe their faster advance and their much more rapid and erratic dodging. Without question, the warrior is the more dangerous foe. On most levels, adult dogs will also require fewer shots to kill than members of the warrior caste. Adult dogs, while still highly dangerous, simply do not present the same threat that warriors do. Level 262 is highly exceptional. Like the warriors, these foes are also found clinging to ceilings in some levels. The same tactics should be employed here: using the pulse rifle or shotgun, run from the enemy (which tends to stay directly overhead until you do so), turn, and fire as many shots as you can before the enemy gets too close. Repeat until it proves fatal. The smartgun can also be employed if you are having a truly difficult time with these unusual foes.
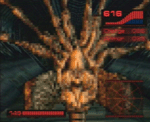
The queen has the longest-range attack of all the aliens, even those annoying chestbursters. She's not so bad, though, because each lair has at least one location where you can fire on her with impunity and she can't reach you at all. She WILL have you emptying several pulse rifle or smartgun magazines before she goes down, though. With the queen more than any other alien it is important to use short, individual pulse rifle bursts rather than firing this weapon on full auto. When using the smartgun, the queen is the ONLY alien you should attempt to employ the short-burst method on; swarms of adult dogs or warriors are far too quick for anything short of full automatic weapons fire. The difference between these 2 methods in the amount of ammunition consumed is remarkable (try it and see!). Since she can't reach you if you stand in the right spot, take your time with the pulse rifle to do her in (unless, of course, there happens to be smartgun ammo present and you are already pretty close to capacity on that weapon anyway). If you like things mano-a-mano instead, pulse rifle or smartgun bursts will actually keep the queen at bay by causing her to flinch--at least, until you miss and the queen has the opportunity to rush you! With decent timing, you can deal with the queen head-to-head this way and take relatively little damage from the encounter. The queen tends to remain attached to the ovipositor until you either hit her with weapons fire or have been in her immediate vicinity for a short period. The best tactic is to crisscross each lair as you work your way toward the queen, killing as many eggs and facehuggers along the way as possible (be very careful not to prematurely shoot the queen, especially if you are using the long-reaching pulse rifle). When you arrive at the queen, quickly dispatch any enemies surrounding her before firing at the queen herself and making your stand. Once she is dead, you are free to finish mopping up. Do make sure you let the queen kill you at least once, though, just to view the entirely awesome death sequence.
With the exception of the alien handlers, which fire pulse rifle grenades, the human enemies will only inflict one hit point per volley, regardless of weapon type. The conservative technique for dealing with humans is to sidestep their potshots while returning fire with the pulse rifle. Better yet, start sniping with same before you have closed the distance enough for the humans to even begin reacting to you. Even if it takes you a while to bring a human down, you normally won't take much damage for it. In spite of this fact, however, at the HARD difficulty setting I often found myself simply grenading humans on certain levels to prevent their very annoying resurrection later on. The human enemies often leave goods behind (usually related to the weapon each carries) upon termination, so on HARD you can really rack up the ammo counters by repeatedly killing and reviving certain bad dudes. A given human will always cough up the same powerup each time he dies. So make friends with the guy carrying the smartgun magazine, and the pulse rifle grenade, and the seismic charge . . . Just one caution: enemy fire can "push" you off a wall or walkway or into an acid puddle or steam jet, thus causing you damage or death, if you're not careful! Generally, though, all the humans are pretty slow and present only a mild threat. While they certainly add variety to the game, even the worst just doesn't instill the fear that even a lowly facehugger elicits.

Carry 9mm automatics and may yield a clip--or an ID tag--upon expiring. Administer 2 shotgun blasts or a pulse rifle burst to cure this affliction. Threat: minimal.
Well, okay--they're not really humans. Settle for "humanoid"? They wield smartguns and take a lot of rounds before going down: 8-10 shotgun blasts or 7-8 pulse rifle bursts. When they finally expire, some leave behind their smartguns or smartgun magazines. How nice!
Tote pulse rifles, but apparently weren't issued pulse rifle grenades (which is fine with me). Go down a lot faster than synthetics: 2-3 shotgun or pulse rifle hits takes one out. Wax one and you might get an ID tag, 9mm pistol, pulse rifle magazine, pulse rifle grenade, or seismic charge for your trouble. For some reason, every single one of these dudes is bald.
Far more dangerous than even the smartgun-armed synthetics because they will fire health-blasting grenades (as well as standard rounds) from their pulse rifles. Get hit and it'll take a 25-point bite out of your armor or health. These guys aren't much tougher than company soldiers; around 3 shotgun or pulse rifle rounds sends one on a permanent vacation (it's only a semi-permanent vacation if you are playing on HARD). They leave behind pulse rifle magazines or grenades when shuffling off to the hereafter. Able to walk through acid pools unscathed.

![]()
Some folks think they are actually saying "Kill me!" instead of "Help me!" I still haven't decided yet. While they won't attack you directly, a chestburster will pop out if you get too close. Dispatch from a distance with a single pulse rifle burst. Not true enemies, they don't come back to life after being killed when playing on HARD. However, chestbursters that come out of them will, so avoid this scenario. And as you work your way closer to the queen in each section, keep reminding yourself: "Well, they were infected anyway!"