![]()
A real life- and ammo-saver is pausing the game to switch weapons. This can save precious seconds, especially later in the game when you have more weapons to cycle through. You can even check your ammunition levels to help you make your choice! Example: blow a facehugger-containing crate with the pistol and quickly pause the game after the last shot; select the shotgun, and when you unpause the game the shotgun is already in your hands and up, ready for action. Another time-saver: you will start the next level with the weapon you were holding when you exited the last level. If you have played ahead and know what gun you want to be holding when the next level starts, switch to it before entering the exit chamber. If you don't know, you will rarely go wrong with the pulse rifle or shotgun. This can save time switching weapons when replaying a saved level repeatedly. BE AWARE that your weapon will pause for a split second when changing clips or magazines (at each 10-mark for the shotgun and at each 100-mark for the pulse rifle or smartgun, for example). I have often received an additional blow from a warrior or adult dog while a new magazine was being loaded and my weapon failed to deliver its payload at the crucial second.
![]()
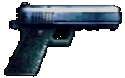
The default weapon will keep firing, but not as an automatic, even when your ammo counter reaches zero, but only if all other weapons are also clean out of ammo. You will abandon this weapon as anything but a crate- or locker-opener in the later levels, although it will still take out eggs and facehuggers if you run desperately low on the more potent stuff.
![]()
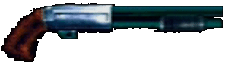
Your top weapon until you get your sweaty mitts on the pulse rifle, but still a steady performer to the very last level of the game. Slow fire rate, but a turbo controller can help here. You may have to shop around for one that fires "in sync" with the shotgun's maximum firing rate and that doesn't discharge the weapon at uneven, "jerky" intervals. Controllers with multiple speed settings for the auto-fire function seem to perform best in this regard. This weapon inflicts punishment over a wide arc--what might have been a near miss with the pulse rifle scores some points when the shotgun is used (but will not do as much damage as a direct shotgun hit). Rarely, this feature will also allow you to take out two facehuggers at once, if they are right next to each other (I've accidentally done it a few times). Great for facehuggers and chestbursters at moderate to close range. The shotshell powerup yields 5 (rarely) or 10 shots, while a shotgun generally holds 10 rounds. A good weapon for handling single warriors or adult dogs because each shot makes the alien flinch a second before resuming the attack. A word of warning: this gun kicks! Stand with your back too close to a steam jet when firing this baby and you may get scalded (or drop off a walkway, or step on a dead alien, or drop into an acid pool, or . . .)
![]()
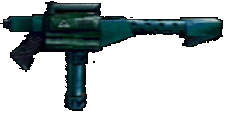
A weak weapon with the most limited range of all, but indispensable for smaller enemies at close range: herds of facehuggers or packs of young dog aliens. At very close range, it cuts a wide swath of damage and is your very best hope for survival when a facehugger is dancing with your bootlaces. Be careful, though, especially with the larger aliens: enemies don't take damage until they are nearer to you than shotgun range, and you may get sprayed with acid at such close distances. Fuel also goes very fast in this weapon.
![]()
Probably the most-used weapon in the game. This gun also has a very high ammo capacity (999 rounds); once you pick this baby up, the face of the game changes dramatically! It is your primary long-range weapon, as well. While the smartgun and pulse rifle grenades also allow you to really reach out and touch someone, there is not enough ammo for either to allow use when the pulse rifle will also get the job done. (This is contrary to Alien vs. Predator for the Atari® JaguarTM in which all the weapons are effective at maximum ranges). There is a definite trick to conserving ammo with the pulse rifle: if you have 600 shots left, for example, one pulse rifle magazine raises you to 700. If you have 601 shots left, a pulse rifle magazine "rounds" your gun up to 800 total! By watching your ammo, judiciously changing weapons, and timing your pickups you can exit most later levels with a decent amount of pulse rifle ammo. Firing in a rapid series of INDIVIDUAL bursts (just like Hicks suggests in the movie Aliens--"short, controlled bursts") kills warriors and adult dog aliens--as well as queens!--faster than simply holding down the fire button continuously, for some reason. This also conserves ammunition. Another advantage of this weapon is that it will shoot straight through enemies to hit foes behind. This may be because the pulse rifle fires armor-piercing rounds. For this reason, it is worth the effort to sidestep so that you line oncoming enemies up one behind the other within the line of fire. Learning to do so (especially with warriors or adult dogs) takes practice, but the results can be lifesaving!
![]()
Your most potent weapon, but one that will damage you at close range. These reach the target much faster and with less trajectory than the seismic charges, making them much easier to use lethally. They also have quite a reach. Use seismic charges for opening secret areas or in spots where aliens are confined and easier to hit; save the grenades for the tougher situations when you have little margin for error or are dealing with fast-moving targets in unconfined spaces. They may bounce on the floor on the way to distant targets.
![]()
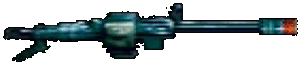
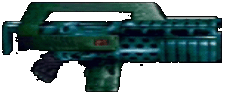
The other long-range weapon in the game, but though the smartgun is a distance shooter, its primary use is for mowing down hordes of aliens in close-quarters combat. There isn't enough ammo available to use the smartgun for long-distance work when you already have the pulse rifle handy. In a crowded room on the lower two difficulty settings you can really see the smartgun at work: "smart" bullets fly at all angles to take out multiple enemies within the gun's firing arc. Smartgun magazines hold the same number of rounds as pulse rifle magazines (100). The pulse rifle ammo-saving trick works exactly the same way for the smartgun. Save this baby for the absolute worst situations: large groups of warriors and packs of adult dogs at close ranges. There is not enough smartgun ammo in the game to waste it on smaller foes. The only exceptions would be hard-to-hit enemies at an abnormally steep angle above or below you. Like the pulse rifle, rounds from this weapon go directly through individual enemies to inflict damage upon anyone or anything else behind them. This means that when dealing with a swarm of aliens, you should sidestep to keep the maximum number directly within the line of fire for the most effective results. A quick series of INDIVIDUAL bursts does more damage than full automatic fire (holding the fire button down continually), also similar to the pulse rifle. This trick, however, works only with the queen; warrior and adult dog swarms move too rapidly for anything but full auto-fire. An unusual feature of the smartgun is that 3 bursts from this weapon will blow open any secret area that would otherwise require a seismic charge or grenade.

They will do you damage at close range. Have the shotgun selected as your weapon, if possible, when launching these accurately is a must. They will go right where the shotgun bead points. They make a great weapon, especially on the hard setting where you want to permanently eliminate an enemy from an area you plan to backtrack to. Warriors and adult dogs dodge a lot and can be hard to hit with the slow-moving charges (and you definitely don't want to use them at close range!); charges work best when these enemies are in a confined area or are coming at you down a narrow hallway or corridor.